Schrödinger Command Line Job Submissions: Difference between revisions
Beginning to fill in documentation |
→Submit Job via Command Line: command to enable schrodinger environment |
||
| (14 intermediate revisions by the same user not shown) | |||
| Line 1: | Line 1: | ||
{{WIP|author=bgo}} | |||
Schrödinger was originally created to run on a workstation, not in an HPC environment like Magnolia. This results in the loss of common job submission controls and more importantly the requirement that the [//en.wikipedia.org/wiki/Graphical_user_interface GUI] be running while the job is running on the cluster. In common HPC environments the GUI is completely independent of the running job meaning that the GUI can be closed while the job is running on the cluster. When the job completes, an email is automatically sent to the user who then starts the GUI and imports the results. This page explains how to run Schrodinger jobs in a manner more closely resembling the server/client environment of HPC systems. | |||
__TOC__ | __TOC__ | ||
| Line 5: | Line 6: | ||
== Initial Setup == | == Initial Setup == | ||
An initial setup, which consists of one-time settings that rarely need to be changed, is required. | |||
=== Queue Settings === | === Queue Settings === | ||
Copy a default configuration into your home directory on Magnolia | The workstation environment that Schrodinger was originally designed for removes the ability of HPC cluster users to control the job queuing system. To allow for users to use two common settings, email notifications and job runtime limits, we have modified the Schrodinger scripts. The modification allows for the use of a configuration file where email and runtime limits can be sent. Each user needs to have this configuration file in their home directory, the easiest way to do this is by copying a default configuration. The instructions in this section assume you are connected to Magnolia (see the [[Connect_to_Magnolia#Connecting_.2F_Login|Connect to Magnolia]] page). | ||
Copy a default configuration into your home directory on Magnolia using this command: | |||
{{Cmd|cp /modules/schrodinger/queue.local-example ${HOME}/.schrodinger/queue.local}} | {{Cmd|cp /modules/schrodinger/queue.local-example ${HOME}/.schrodinger/queue.local}} | ||
| Line 41: | Line 44: | ||
}} | }} | ||
The {{Path|queue.local}} file should be | The {{Path|queue.local}} file should be modified to have your email and maximum job runtime. To edit the file, use the {{C|nano}} editor: | ||
{{Cmd|nano -w ${HOME}/.schrodinger/queue.local}} | |||
{{Cmd|nano -w ${HOME}/. | |||
To save any | Use the cursor keys to move around the file and make changes. To save any changes you make, use {{Key|Ctrl}}+{{Key|O}}, then hit {{Key|Enter}} to accept the file name. Use {{Key|Ctrl}}+{{Key|X}} to exit {{C|nano}}. | ||
{{FileBox|title=(after editing)|filename=${HOME}/.schrodinger/queue.local|1= | {{FileBox|title=(after editing)|filename=${HOME}/.schrodinger/queue.local|1= | ||
| Line 71: | Line 73: | ||
}} | }} | ||
This sends email when a job is complete to | This example sends an email when a job is complete to ''example@gmail.com'', you should change this to where you'd like email sent. The maximum job run time is set to 2 days, 1 hour, 10 minutes, and 11 seconds. | ||
{{Note|If ''#'' is the first character on a line, then the whole line is considered a comment and ignored. Therefore, remove any ''#'' for settings you wish to use. Notice that there is no ''#'' before the last three (3) lines of the example.}} | {{Note|If ''#'' is the first character on a line, then the whole line is considered a comment and ignored. Therefore, remove any ''#'' characters for settings you wish to use. Notice that there is no ''#'' before the last three (3) lines of the example.}} | ||
=== Job Settings === | === Job Settings === | ||
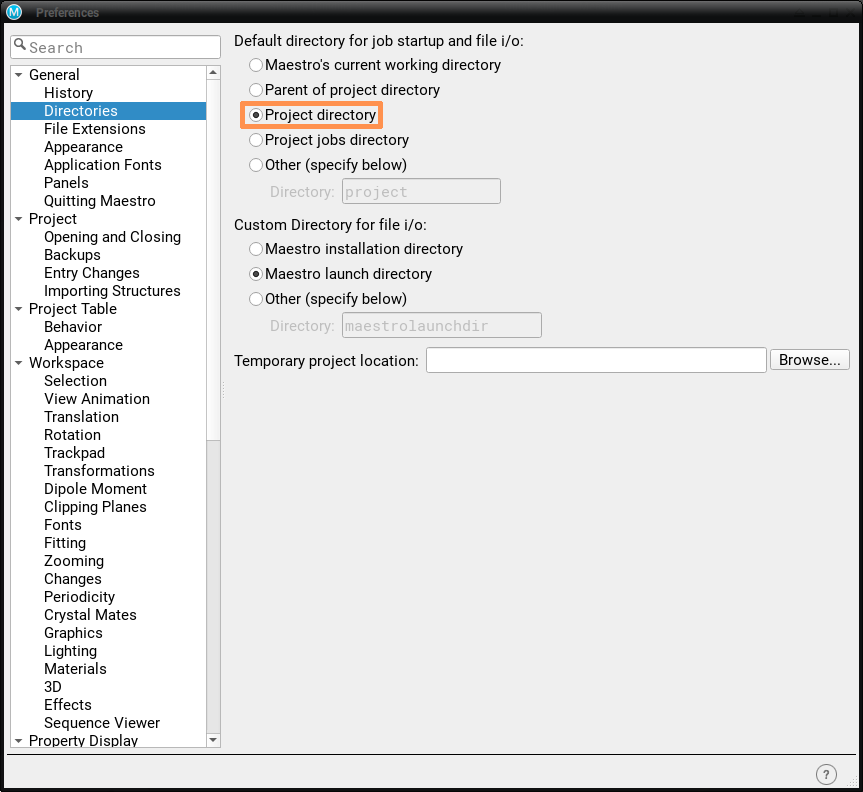
The following settings control show the files for jobs are saved. By default, the files will be saved in your home directory. To help organize the job files, it is convenient to have jobs saved in the project directory of Schrodinger. These settings need to be set in the GUI. Launch Schrodinger and open the preferences window (Edit->Preferences) and change the ''Default directory for job startup and i/o'' to ''Project Directory'': | |||
[[File:Schrodinger-Preferences-Directories.png]] | |||
This completes the initial setup, the following is required for each job you wish to submit. | |||
== Create Job for Command Line Submission == | == Create Job for Command Line Submission == | ||
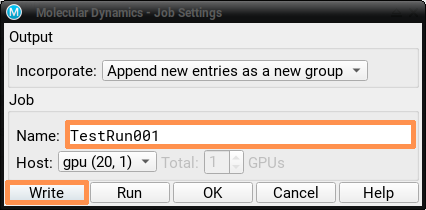
Setup a Molecular Dynamics job in the GUI as usual, but instead of directly running the job click the gear icon next to the ''Job Name'' to bring up the ''Molecular Dynamics - Job Settings'' dialog. | |||
[[File:Schrodinger-JobSettings-Dialog.png]] | |||
The job name field will be the name of a directory created, so fill this in with something easy to remember, and without spaces. | |||
At this point, normally the ''Run'' button is clicked and the job is sent through the GUI. However, since we want to submit our job through the command line, here we click the ''Write'' button and then close the ''Molecular Dynaimcs - Job Settings'' dialog window. | |||
We are done with the GUI for now, so close all of the Schrodinger GUI windows. | |||
== Submit Job via Command Line == | == Submit Job via Command Line == | ||
Connect to | [[Connect_to_Magnolia#Connecting_.2F_Login|Connect to Magnolia]] and go to the directory that was created in the [[#Create Job for Command Line Submission|Create Job for Command Line Submission]] section. If you followed the instructions in the [[#Job Settings|job settings]] section the directory will be inside the project directory. For example, if the project is named ''TestProject'' and the job was named ''TestJob001'' use: | ||
{{Cmd|cd ${HOME}/TestProject/TestJob01}} | {{Cmd|cd ${HOME}/TestProject.prj/TestJob01}} | ||
Once there check which files are present in that directory | Once there, check which files are present in that directory with the {{C|ls}} command. You should see something like: | ||
{{Cmd|ls -l|output=<pre> | {{Cmd|ls -l|output=<pre> | ||
TestRun001.cfg | TestRun001.cfg | ||
| Line 101: | Line 109: | ||
</pre>}} | </pre>}} | ||
Most of the files define your structure and molecular dynamics job type, but the file ending in ''.sh'' is an executable | Most of the files define your structure and molecular dynamics job type, but the file ending in ''.sh'' is an executable which will build the submission script and submit it to the cluster. First, we have to enable the Schrodinger environment with: | ||
{{Cmd|module load schrodinger}} | |||
Now execute the script with | |||
{{Cmd|./TestRun001.sh}} | {{Cmd|./TestRun001.sh}} | ||
| Line 116: | Line 127: | ||
{{Cmd|squeue -u user}} | {{Cmd|squeue -u user}} | ||
where the text | where the text ''user'' needs to be replaced with your Magnolia username. | ||
If you completed the | If you completed the [[#Initial Setup|initial setup]] steps and configured the queue to send you an email when jobs complete, simply wait until you receive the email. Otherwise you'll have to use the two {{C|squeue}} commands above to check if your job has completed. | ||
== Load Completed Job into the GUI == | == Load Completed Job into the GUI == | ||
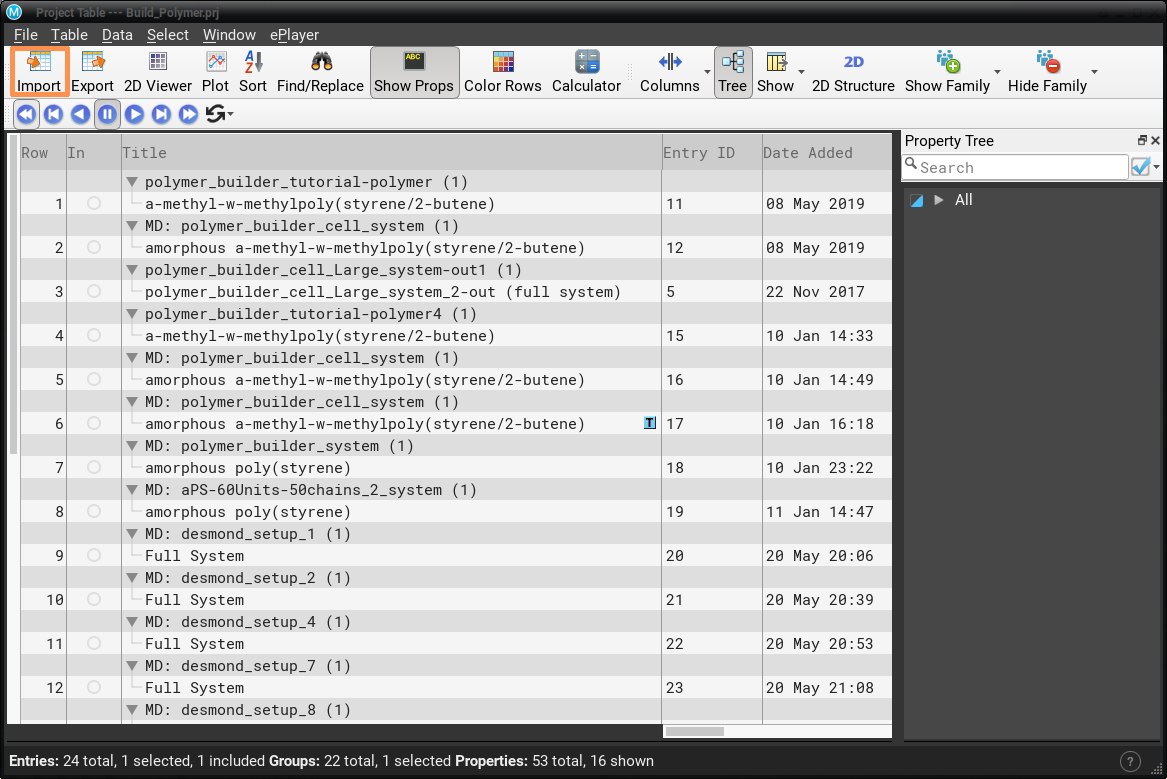
Now that the job has completed, the results need to be imported into your Schrodinger project. Load up the Schrodinger GUI and open the ''Project Table'' by going to Window->Project Table. The sample project table here has 24 rows, the results will be loaded into the next row. | |||
[[File:Schrodinger-ProjectTable.png]] | |||
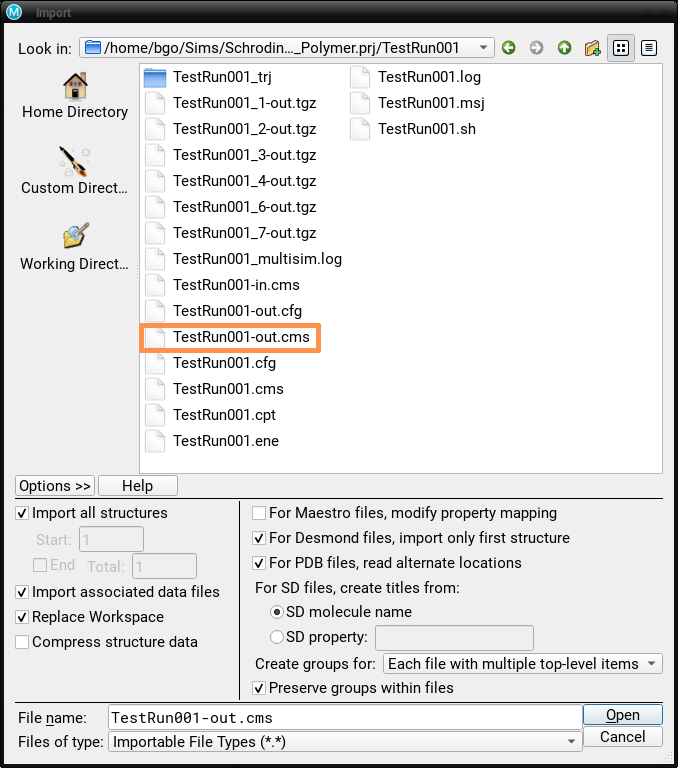
Click on the ''Import'' button of the ''Project Table'', this will bring up a file browser. Navigate to the directory where the job files are stored (see [[#Submit Job via Command Line|submit job via command line]] section). | |||
[[File:Schrodinger-Import-Dialog.png]] | |||
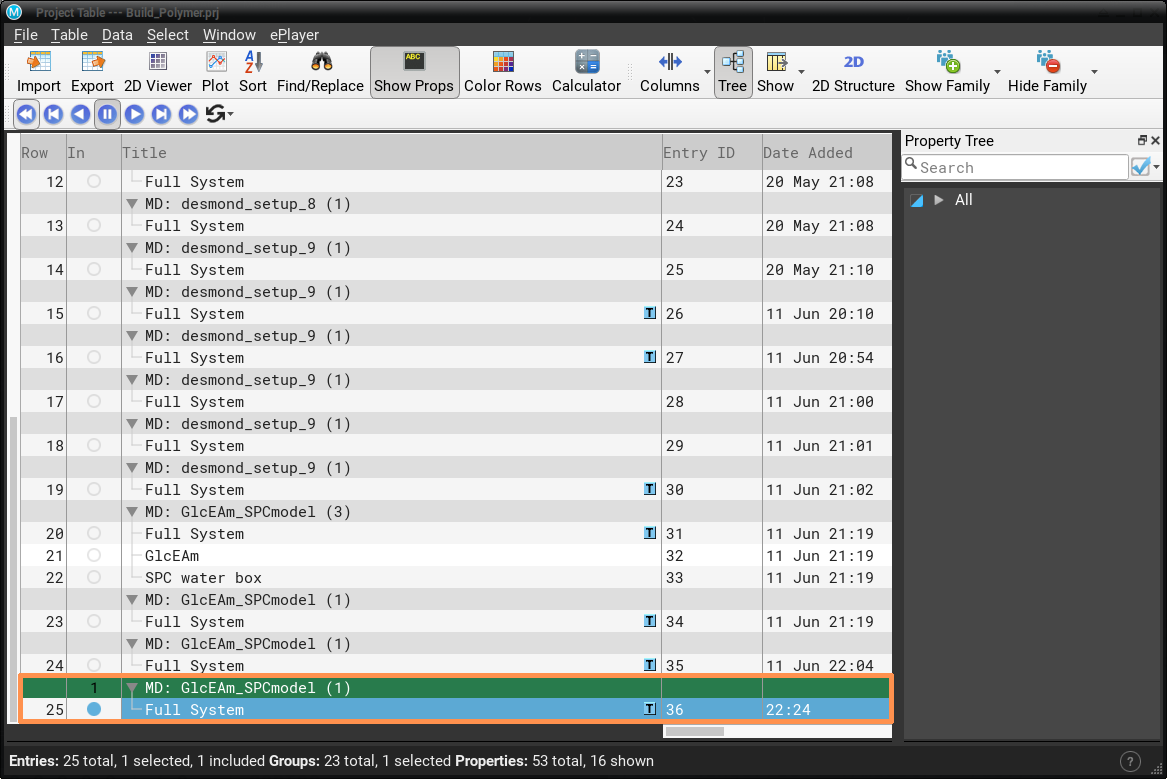
The file to import ends with ''-out.cms'', select it and click the ''Open'' button. This will drop you back to the ''Project Table'' window where the import results should be in a new row of the table (row 25 of this example). | |||
[[File:Schrodinger-ProjectTable-Imported.png]] | |||
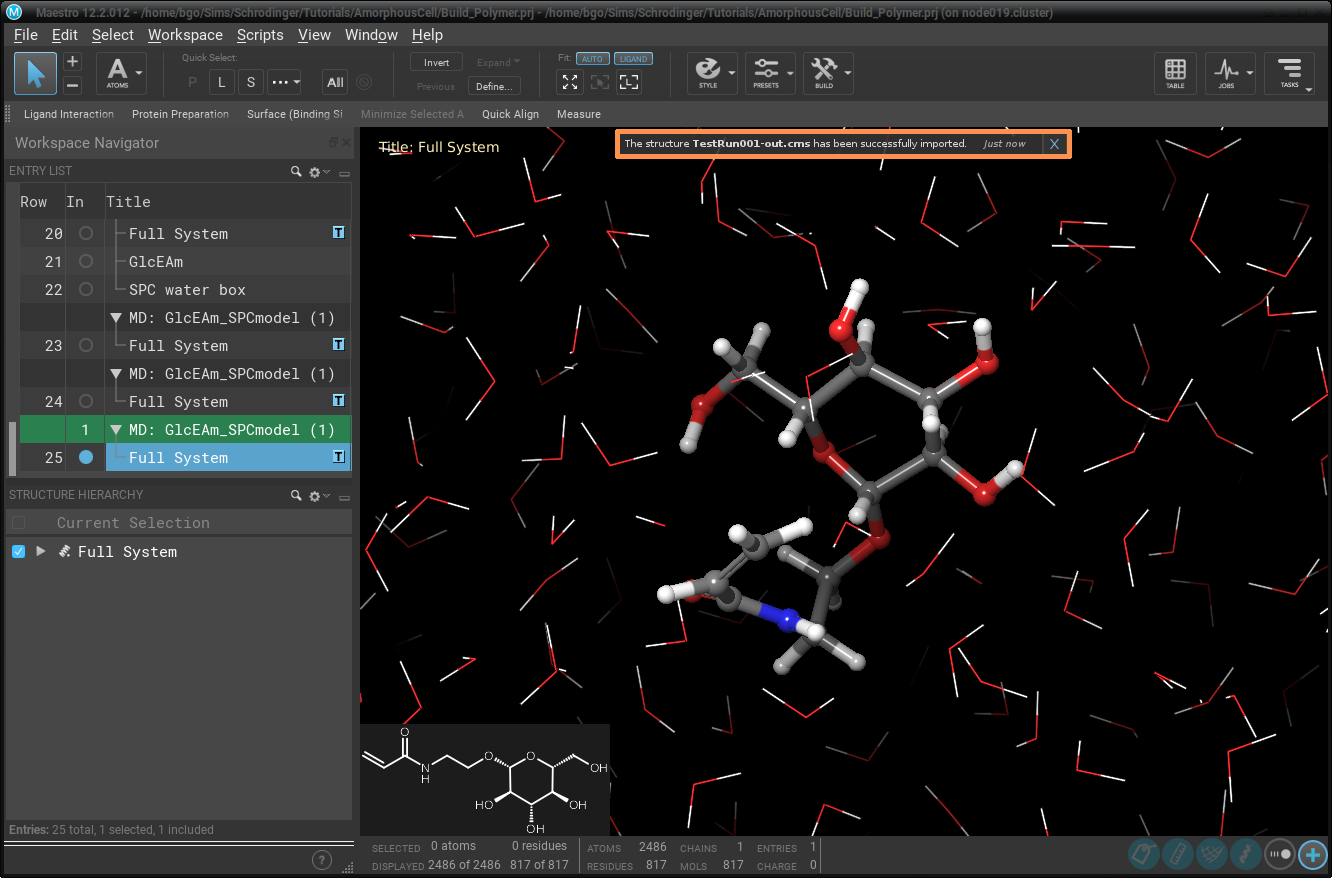
The results should now be imported into your project. Close the ''Project Table'' window to bring you back to the normal Schrodinger project window. There should be a small notification at the top of the window stating that a new structure has been imported into your project. | |||
[[File:Schrodinger-Imported.png]] | |||
Now continue with your normal analysis in Schrodinger. To submit a new job, follow the directions starting at the [[#Create Job for Command Line Submission|Create Job for Command Line Submission]] step. | |||
[[Category:Tutorials]] | |||
Latest revision as of 14:03, 19 June 2020
Schrödinger was originally created to run on a workstation, not in an HPC environment like Magnolia. This results in the loss of common job submission controls and more importantly the requirement that the GUI be running while the job is running on the cluster. In common HPC environments the GUI is completely independent of the running job meaning that the GUI can be closed while the job is running on the cluster. When the job completes, an email is automatically sent to the user who then starts the GUI and imports the results. This page explains how to run Schrodinger jobs in a manner more closely resembling the server/client environment of HPC systems.
Initial Setup
An initial setup, which consists of one-time settings that rarely need to be changed, is required.
Queue Settings
The workstation environment that Schrodinger was originally designed for removes the ability of HPC cluster users to control the job queuing system. To allow for users to use two common settings, email notifications and job runtime limits, we have modified the Schrodinger scripts. The modification allows for the use of a configuration file where email and runtime limits can be sent. Each user needs to have this configuration file in their home directory, the easiest way to do this is by copying a default configuration. The instructions in this section assume you are connected to Magnolia (see the Connect to Magnolia page).
Copy a default configuration into your home directory on Magnolia using this command:
user $cp /modules/schrodinger/queue.local-example ${HOME}/.schrodinger/queue.localTo show the contents of the file, use:
user $cat ${HOME}/.schrodinger/queue.localThe default file should look something like:
${HOME}/.schrodinger/queue.local# Configuration for per user job settings # This file must be located in your $HOME/.schrodinger directory. # # To enable, use: # # cp /modules/schrodinger/queue.local-example ~/.schrodinger/queue.local # # SCHROD_SLURM_TIME # Max run time for jobs submitted to queue. # # 0-05:00:00 means 0 days and 5 hours. # # See https://slurm.schedmd.com/sbatch.html#OPT_time # for time format. # # Errors like 'Unable to submit job for batch execution' # may mean that the value entered below is invalid. # SCHROD_SLURM_TIME=0-05:00:00 #SCHROD_SLURM_EMAIL=me@usm.edu #SCHROD_SLURM_EMAIL_TYPE=END
The queue.local file should be modified to have your email and maximum job runtime. To edit the file, use the nano editor:
user $nano -w ${HOME}/.schrodinger/queue.localUse the cursor keys to move around the file and make changes. To save any changes you make, use Ctrl+O, then hit Enter to accept the file name. Use Ctrl+X to exit nano.
${HOME}/.schrodinger/queue.local(after editing)# Configuration for per user job settings # This file must be located in your $HOME/.schrodinger directory. # # To enable, use: # # cp /modules/schrodinger/queue.local-example ~/.schrodinger/queue.local # # SCHROD_SLURM_TIME # Max run time for jobs submitted to queue. # # 0-05:00:00 means 0 days and 5 hours. # # See https://slurm.schedmd.com/sbatch.html#OPT_time # for time format. # # Errors like 'Unable to submit job for batch execution' # may mean that the value entered below is invalid. # SCHROD_SLURM_TIME=2-01:10:11 SCHROD_SLURM_EMAIL=example@gmail.com SCHROD_SLURM_EMAIL_TYPE=END
This example sends an email when a job is complete to example@gmail.com, you should change this to where you'd like email sent. The maximum job run time is set to 2 days, 1 hour, 10 minutes, and 11 seconds.
If # is the first character on a line, then the whole line is considered a comment and ignored. Therefore, remove any # characters for settings you wish to use. Notice that there is no # before the last three (3) lines of the example.
Job Settings
The following settings control show the files for jobs are saved. By default, the files will be saved in your home directory. To help organize the job files, it is convenient to have jobs saved in the project directory of Schrodinger. These settings need to be set in the GUI. Launch Schrodinger and open the preferences window (Edit->Preferences) and change the Default directory for job startup and i/o to Project Directory:
This completes the initial setup, the following is required for each job you wish to submit.
Create Job for Command Line Submission
Setup a Molecular Dynamics job in the GUI as usual, but instead of directly running the job click the gear icon next to the Job Name to bring up the Molecular Dynamics - Job Settings dialog.
The job name field will be the name of a directory created, so fill this in with something easy to remember, and without spaces.
At this point, normally the Run button is clicked and the job is sent through the GUI. However, since we want to submit our job through the command line, here we click the Write button and then close the Molecular Dynaimcs - Job Settings dialog window.
We are done with the GUI for now, so close all of the Schrodinger GUI windows.
Submit Job via Command Line
Connect to Magnolia and go to the directory that was created in the Create Job for Command Line Submission section. If you followed the instructions in the job settings section the directory will be inside the project directory. For example, if the project is named TestProject and the job was named TestJob001 use:
user $cd ${HOME}/TestProject.prj/TestJob01Once there, check which files are present in that directory with the ls command. You should see something like:
user $ls -lTestRun001.cfg TestRun001.cms TestRun001.msj TestRun001.sh
Most of the files define your structure and molecular dynamics job type, but the file ending in .sh is an executable which will build the submission script and submit it to the cluster. First, we have to enable the Schrodinger environment with:
user $module load schrodingerNow execute the script with
user $./TestRun001.shThe leading dot of the previous command is important.
The command will take a few moments to complete, then drop you back to a prompt where you can type. Your job should now be submitted.
Wait for job to Complete
Your job should be submitted to the cluster now and is either running or waiting to run. To check the status of your job, run a command like:
user $squeue -p gpuThis command shows all jobs on the GPU nodes. To see jobs only belonging to yourself, use a command like:
user $squeue -u userwhere the text user needs to be replaced with your Magnolia username.
If you completed the initial setup steps and configured the queue to send you an email when jobs complete, simply wait until you receive the email. Otherwise you'll have to use the two squeue commands above to check if your job has completed.
Load Completed Job into the GUI
Now that the job has completed, the results need to be imported into your Schrodinger project. Load up the Schrodinger GUI and open the Project Table by going to Window->Project Table. The sample project table here has 24 rows, the results will be loaded into the next row.
Click on the Import button of the Project Table, this will bring up a file browser. Navigate to the directory where the job files are stored (see submit job via command line section).
The file to import ends with -out.cms, select it and click the Open button. This will drop you back to the Project Table window where the import results should be in a new row of the table (row 25 of this example).
The results should now be imported into your project. Close the Project Table window to bring you back to the normal Schrodinger project window. There should be a small notification at the top of the window stating that a new structure has been imported into your project.
Now continue with your normal analysis in Schrodinger. To submit a new job, follow the directions starting at the Create Job for Command Line Submission step.
